Expert Tips to Troubleshoot Plotters for Vinyl Wraps
Introduction: Mastering Vinyl Plotter Cutting
Vinyl cutting is a precise and reliable method for producing custom designs on wraps, decals, and signage. Whether you're just starting or have years of experience, achieving clean results depends on fine-tuning your plotter settings—such as cutting force, speed, blade angle, and media alignment. This guide offers step-by-step solutions to help you avoid common issues and consistently deliver accurate, professional vinyl cuts.
1. Choose the Right Vinyl Media and Remove Bubbles
The first step toward a flawless cut is selecting a smooth, high-quality vinyl sheet. Avoid materials with air bubbles, wrinkles, or surface damage.
- Use a squeegee to press the vinyl flat and eliminate trapped air.
- Inspect the surface carefully before loading it into the machine.
Any irregularities in the vinyl can disrupt blade contact and compromise the precision of the cut.
2. Adjust Cutting Force and Speed for Different Vinyl Types
Each type of vinyl requires unique machine settings. Thicker materials, such as laminated or specialty vinyl, need a higher cutting force (typically between 28 and 34) and a stronger blade like a 60° angle. Thinner, standard vinyl performs better at lower force levels (around 12–15) and lower speeds.
Always perform test runs to dial in the best combination of speed and pressure for your specific media.

3. Use the Correct Blade Angle for the Job
Blade selection is crucial. Using the wrong angle can lead to jagged edges or incomplete cuts:
- A 60° blade is best for thick or textured vinyl.
- For smooth, flat materials, a 45° or 30° blade will provide clean, efficient cuts.
Matching the blade angle to the media surface improves both accuracy and blade longevity.

4. Align Vinyl Sheets Properly Before Cutting
Improper alignment is a leading cause of skewed or failed cuts. To avoid this:
- Ensure the vinyl is loaded beneath the push rollers with even tension.
- Check that the sheet is aligned both vertically and horizontally within the plotter.
Proper alignment helps the cutter track the design correctly across the surface.

5. Always Perform a Test Cut with New Materials
Before cutting a full design on a new type of vinyl, run a small test cut. This allows you to:
- Fine-tune the force and depth settings.
- Identify any issues with the material or blade before wasting vinyl.
Repeat this process anytime you change materials or blades.

6. Keep Plotter Rollers and Grips Clean
Dust, small vinyl fragments, and adhesive residue can build up around the push rollers and grip zones. These can affect feed accuracy and cut quality. Clean these areas regularly with a dry, lint-free cloth to keep the plotter running smoothly.
7. Verify File Dimensions Before Cutting
Before sending your design to the plotter, double-check the CutFile dimensions against the original layout or supplier specs. Incorrect scaling can lead to misaligned designs and wasted materials.
Confirm that both the design file and cutting software match the intended size.

8. Double-Check Cut Size Before Application
After cutting, compare the vinyl piece to the original dimensions before applying it to any surface. This step helps prevent misalignment, fitting issues, or wasted materials—especially for wraps and large-format designs.
Use a ruler or measuring tool to ensure the cut matches your intended output.

9. Maintain Blade Cleanliness and Sharpness
A dirty or dull blade can cause torn edges, missed sections, or uneven pressure. After each job:
- Wipe the blade clean of vinyl fragments and adhesive.
- If cuts are no longer clean even after adjusting force, replace the blade with a new one.
Regular maintenance ensures consistent cutting performance and prolongs the life of your tools.

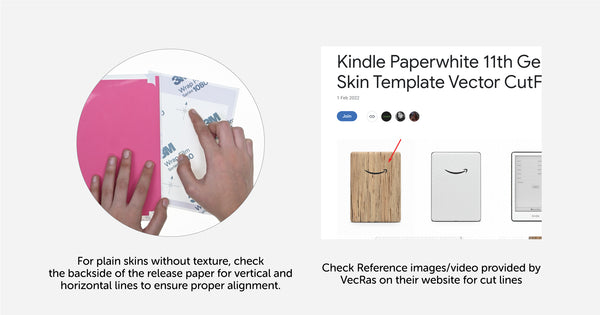
10. Follow the Correct Cutting Direction
For skins or wraps that follow a specific texture or pattern, it's essential to match the cut direction to the design reference:
- If vertical lines are shown in the preview or reference images (e.g., from VecRas), cut vertically.
- If the reference displays horizontal lines, cut in that direction.
- For plain materials, examine the back of the release liner for directional indicators.
This ensures your final application matches the intended look and alignment.
Conclusion: Achieve Flawless Results with Smart Troubleshooting
By following these expert troubleshooting steps, you can solve common vinyl plotter issues and consistently produce clean, professional-grade cuts. The right combination of blade selection, force and speed settings, sheet alignment, and equipment maintenance is the key to mastering vinyl wrap production.